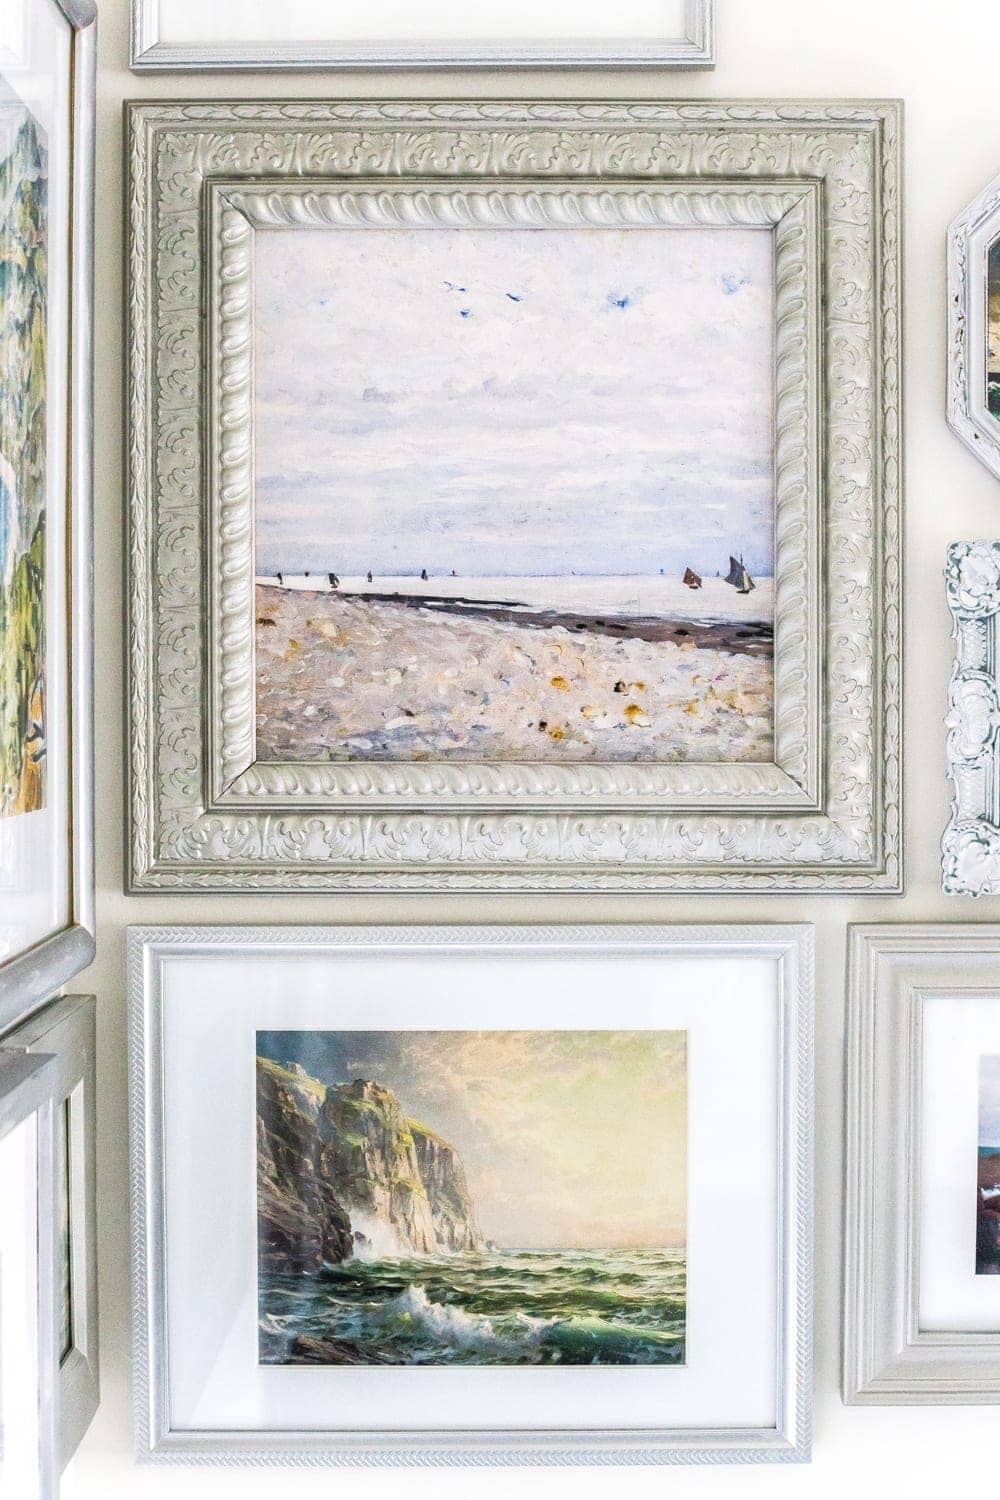
A free printable set of a coastal gallery wall featuring antique ocean paintings and how to frame them inexpensively with thrifted finds.Just so you know, our bathroom takes itself very seriously now. If it were a person, it’d be the beret wearing, poetry spouting, pinky-up type. Because it just got a mini art gallery all up in the corner in only THE fanciest place you could ever put an art gallery… above the toilet.
If you’re thinking, “Another gallery wall, Lauren? Really? Don’t you have enough?” The answer is no. No, I do not. Because can you ever really have enough gallery walls? Also no. This one is way more funky and quirky than the others I’ve done in our living room, staircase, and dining room. This one, even though it could smoke a cigarette and play the bongos in a dimly lit performance art club, it’s not nearly as traditional or as subdued as the others.
I always say bathrooms are where you can play the wild card. Put up a unique wallpaper pattern that you wouldn’t dare put anywhere else. Paint the walls a bold hue. Or, this time, gather up a bunch of thrifted frames, print a bunch of free public domain art, and have a party.
I really was drawing a blank on this giant wall before:
But since the goal was for us to spend as little as possible on this master bathroom refresh and to try using as many resources as we already had, this big wall of coastal landscapes definitely achieved that. I gathered up all of the old frames lying around in my stash that I could find and brought home a few more from the thrift store for around $2-5 each to fill in the gaps. And I dug through a TON of public domain archives to find all kinds of beautiful antique paintings of ocean scenes. I figured the ocean pictures were bound to have shades of the blue/green color we used on our vanity cabinets, and the beach is my happy place anyway, so why not? I’ve mentioned before that I’m “team anti-bossy art” and against art with eyes in the bathroom, and coastal art avoids both of those, thankfully.
Supplies Used:(Some affiliate links are provided below. Full disclosure here.)
Here are the steps I used:1. I split my picture frame collection into three groups to paint with two different types of silver spray paint and a silver Rub n’ Buff to make them look cohesive but not completely matching. (Our faucets in this bathroom are brushed nickel, so I wanted to tie them in with those.)
2. For the coastal prints, I just printed off the 8×10 and smaller sizes from a computer printer. And I chose a couple of favorite large sized prints to have printed from Shutterfly (with a coupon code, of course). 3. To make some of them look matted, I just cut out white poster board (a big pack for $5) that I fit to the size of my frames, stuck the pictures I cut out onto the front of the poster board with some simple Scotch tape, placed them in the frames, and I swear you can’t even tell.
Lola, my little shadow, helped me, of course.
4. To arrange them on the wall, I used my usual gallery wall planning trick by tracing my frames, cutting them out on my remaining poster board (leftover Christmas wrapping paper works well too), and taping them up to decide until I was totally happy with the look.
The entire wall cost around $50 total. Not too shabby, huh? If you want the coastal gallery wall printable set, you can click here or the button below to subscribe and get them in your inbox:
If you’re currently a subscriber, the file is already in your email (or you can access the printable library from the bottom of every Bless’er House email).
Now that this art is up, this master bathroom is officially FINISHED! I’ll be sharing its full reveal next week. Ahhhh! Can’t wait! It’s so good. If you want to save this post for later, you can pin it here:
The post Coastal Gallery Wall and Printable Set appeared first on Bless'er House. Originally from Bless'er House https://ift.tt/2Vp42mE
0 Comments
Happy almost Friday, friends! We are experiencing fake spring here in the Carolinas, which basically means the sun has come out for a couple of days, just long enough to play with our emotions before saying, “Hahaha! Suckaaaas! See you in a couple of weeks. My buddy winter is flying in for one more visit.” So we’ve been enjoying the pretty weather while we can get it and putting a couple of projects on the back burner for a rainy day (literally). The last few months, I’ve gotten sucked down an Instagram rabbit hole of gorgeous interior, photography, and floral feeds, and I thought it would be fun to share a few of them with y’all, if you’re currently snowed in and craving some inspiration.
I have a feeling I’ll be channeling a little bit of all of these accounts soon as we start up some new projects and start brightening up the house for the warmer days ahead. 1. I absolutely ADORE this little breakfast nook, and it’s definitely channeling some vibes that I hope to eventually achieve in our own nook that’s currently in redecorating mode. Isn’t that light fixture so pretty?!
2. I found this account over Christmas and it makes me crave white and wood combos like something fierce.
3. I’ve been following this feed for a long time, and Kathleen never disappoints to share beautiful interior inspirations from everywhere, as well as her own designs.
4. If you love timeless interior design, this feed is packed full of it!
5. This whole account is so clean and crisp and fresh, its interiors make me feel like I can breathe easier.
6. This tile floor is sending me into major inspiration mode for an upcoming project that I can’t wait to share with y’all. But for now, this feed is full of beautiful interior goodies that I’m ALL about.
7. If you don’t already follow this feed, Brady Tolbert is a stylist who works alongside Emily Henderson quite a bit. Each space he styles is filled with tons of beautiful textures.
8. All the heart eyes for cozy warm tones and wood! This feed is full of it.
9. I must be living in a hole because I only just recently started following this account, but it’s quickly become one of my favorites. So much beautiful interior design inspiration that’s minimal but homey.
10. I’ve NEVER seen a photographer capture light as beautifully as Christina does. If you love architecture, this one is a must follow.
11. There are so many CUTE exteriors on this feed! And all of them have such stunning colors.
12. This feed has been around a long time too, but it never gets old with all of its bright, cheerful flowers. And with spring coming, it’s a must follow for me right now.
Do you have any favorite Instagram feeds that give you tons of inspiration? I’d love to discover more! So share them in the comments below. If you feel like following me over there, my feed is here. And if you have an IG feed you’d like to share, drop it below too!
The post 12 Instagram Feeds That Are Inspiring Me Right Now appeared first on Bless'er House. Originally from Bless'er House https://ift.tt/2SwelmW
Via http://thepaintedhive.net/2019/02/how-to-make-a-diy-frosted-glass-sign/ This post is sponsored by Walmart. Remember that whole decision making visualization adventure we had in our breakfast nook last week? (If that post taught me anything, it’s that I’m one LUCKY girl to have y’all to give me direction when I feel lost. #SoNotAPro #DesignerWannabe) This room stumped me since Day 1 of moving in, which looked like this nearly two years ago, by the way…
But so many of you had the same realization I did about this small, oddly laid out space. The Craigslist table we’d bought when we first moved in desperately needed to be swapped out for a round one to help with the traffic flow and to keep us from bumping elbows during family meals.
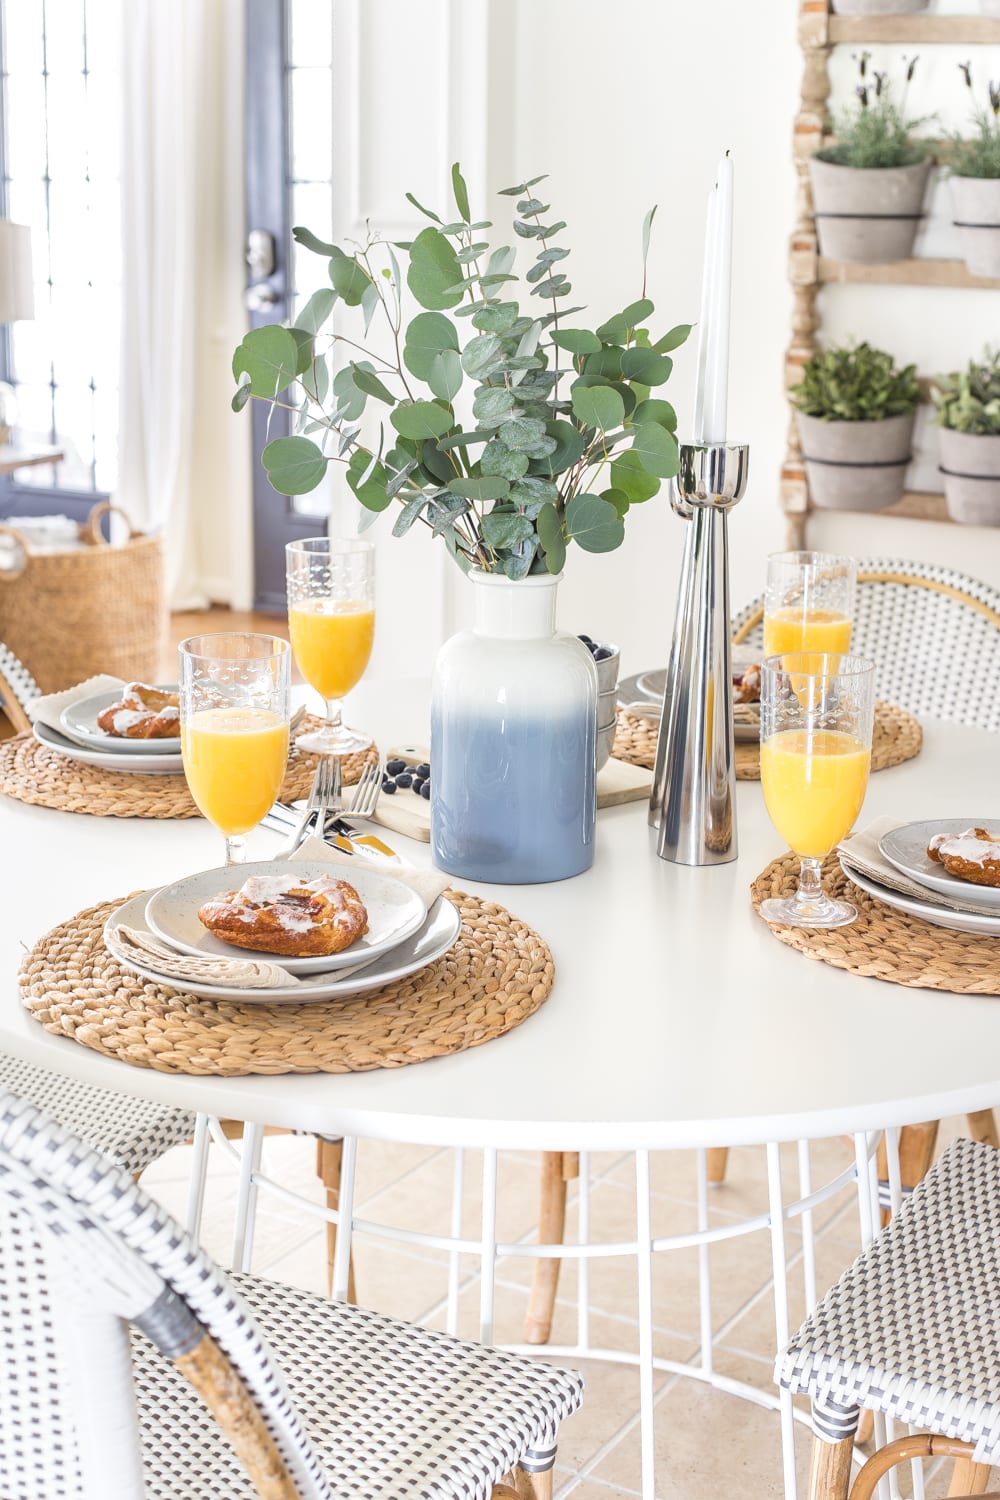
And then as I was browsing around for a winner, I found out that Walmart just released its own private label brand called MoDRN, and this Scandinavian table pulled at my little Swedish heartstrings. Their line has pieces designed around scandi minimal, retro glam, and refined industrial styles.
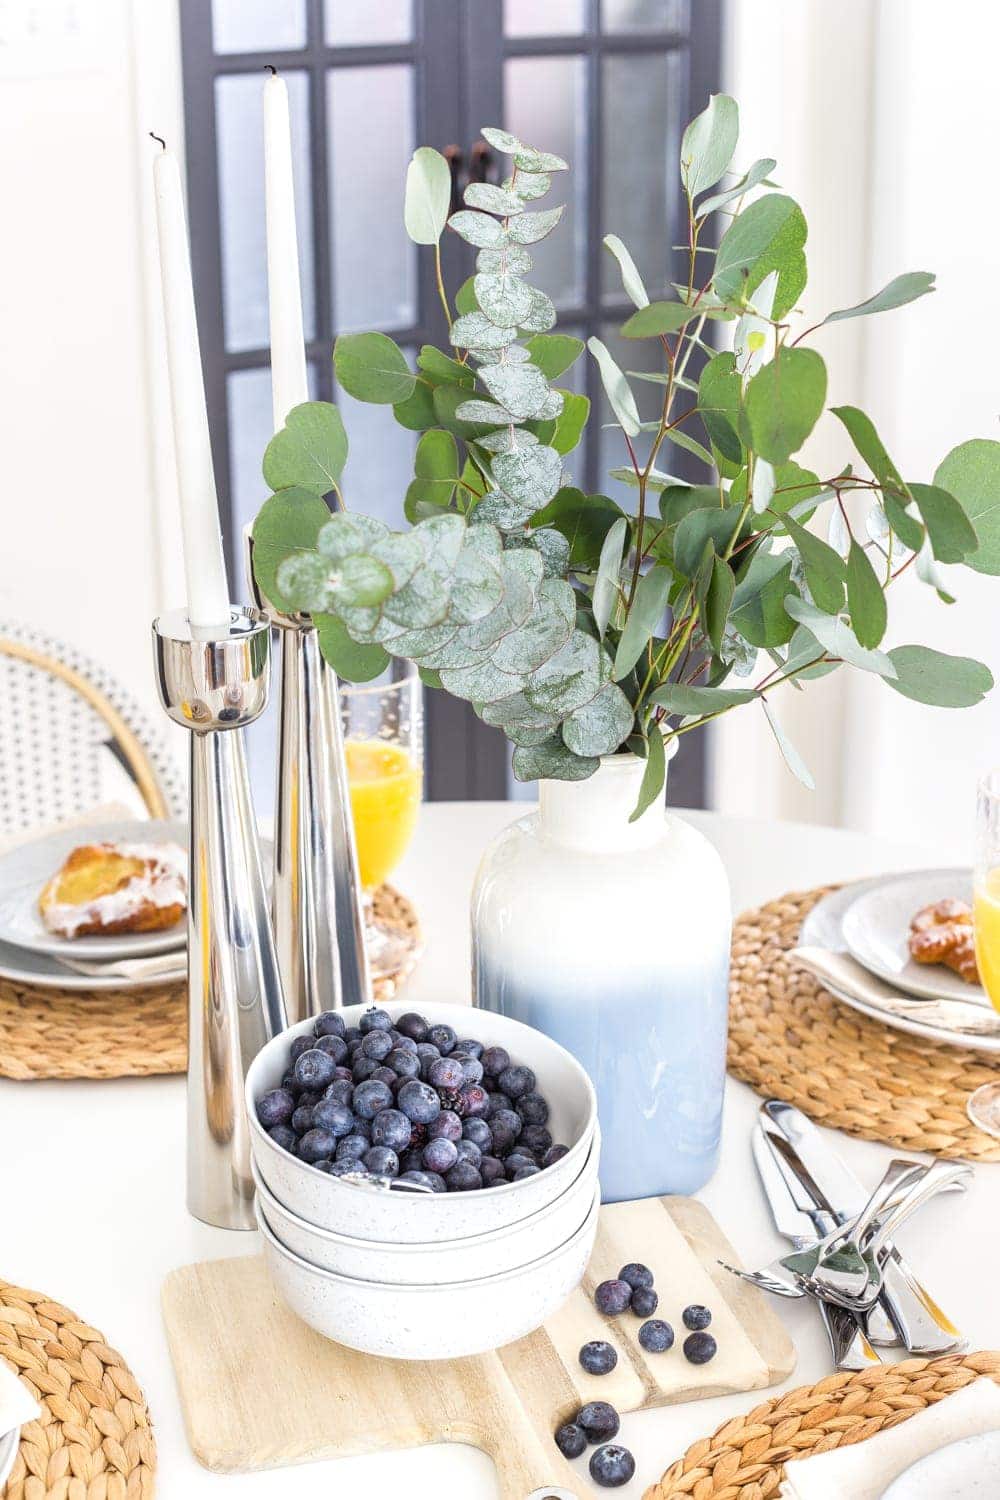
This space isn’t really finished, in my eyes, but it’s a step in the right direction. I’ve mentioned before that I’ve been trying to let go of the farmhouse look a bit for a more sophisticated, modern-meets-traditional style. In our colonial home, the super rustic farmhouse stuff feels a little out of place. So I did something new for a change. I sprung for modern Scandinavian. And do you know what? It feels fresh and clean and minimalist, which is what our lives desperately need at the moment with a messy, high maintenance almost 5 month old.
That farmhousey DIY wall planter and pendant light will be hanging around for a while longer until we decide what to swap them out with. And I love that, for now, it mixes the best of both worlds while we transition the style of this space. (Don’t worry; I’m picturing a more traditional light fixture and wall decor to tone down the modern, so it feels more cozy and classic in here.) Robert and Olivia have sprawled out around this table every night after dinner to color and do science projects together before bedtime ever since it arrived (that’s their “thing” and it’s adorable).
I added in this oversized metal clock too since we’re always needing one at a glimpse from the adjoining living room.
And I stuck these Scandinavian style candle holders and this sweet blue vase in the middle for a touch of spring thinking just maybe it’ll encourage the weather outside to take a hint already.
These speckled dishes came from the Walmart MoDRN line too, since I’ve been wanting some neutral casual dinnerware that’s durable for Olivia to clunk around.
The only thing is I’m concerned that the table might be just a teeny bit too big for the space. Robert says it’s perfect because he loves having room to sprawl out at meals. Y’all settle the debate for me on that one, but it’s definitely proven that round is the way to go in this space. Sometime soon, I’d love to add a rug to soften the space until we can one day (probably years from now) tackle a flooring renovation. But we’ll get to that one step at a time. Home wasn’t built in a day, right?
I’m just thankful that our little family finally has enough room now to enjoy breakfast and dinner together without bumping elbows, especially since it’s about to get a whole lot messier with Regan ready to start solid foods soon. If you’ve been leaning a little more modern in your decorating style lately too, you can see more from the Walmart MoDRN line here to get more modern designer looking furniture and decor for a not-as-designery price tag.
//
!function(d,s,id){
var e, p = /^http:/.test(d.location) ? 'http' : 'https';
if(!d.getElementById(id)) {
e = d.createElement(s);
e.id = id;
e.src = p + '://widgets.rewardstyle.com/js/shopthepost.js';
d.body.appendChild(e);
}
if(typeof window.__stp === 'object') if(d.readyState === 'complete') {
window.__stp.init();
}
}(document, 'script', 'shopthepost-script');
//
 Turn on your JavaScript to view content Turn on your JavaScript to view content
You can find all of the sources I used here:
You think all of the blues and greenery in this space will encourage spring to get here a little faster? Here’s hoping anyway!
The post Scandinavian Farmhouse Breakfast Nook appeared first on Bless'er House. Originally from Bless'er House https://ift.tt/2Ey8cDa How to add a stoneware look to thrifted glass vases and bottles using just paint.I don’t know if you’ve noticed lately, but suddenly stoneware vases are everywhere. Last year, I first noticed them in some of the more high end designer home stores, and when I was wandering around Target last week, the shelves were stocked full of so many cute ones. But if you have a bunch of old vases already in your stash or you happen to snag a few cheapos at the thrift store for a buck or two, this little project is a fun one for recycling them to fit the trend.
(Some affiliate links are provided below. Full disclosure here.) Supplies Used:
This is definitely one of those only-do-this-project-if-you-have-most-of-the-materials-already kind. If you go out and buy a $10 vase, the spray primer, the spray paint, the craft paint, and the painter’s tape, you might as well go buy the real stoneware vase and call it done.
What’s that saying? Why buy a $30 vase when you can make it for $200? Well, the supplies wouldn’t cost $200 but you get it, right? We luckily already had the primer, vase, tape, and craft paint.
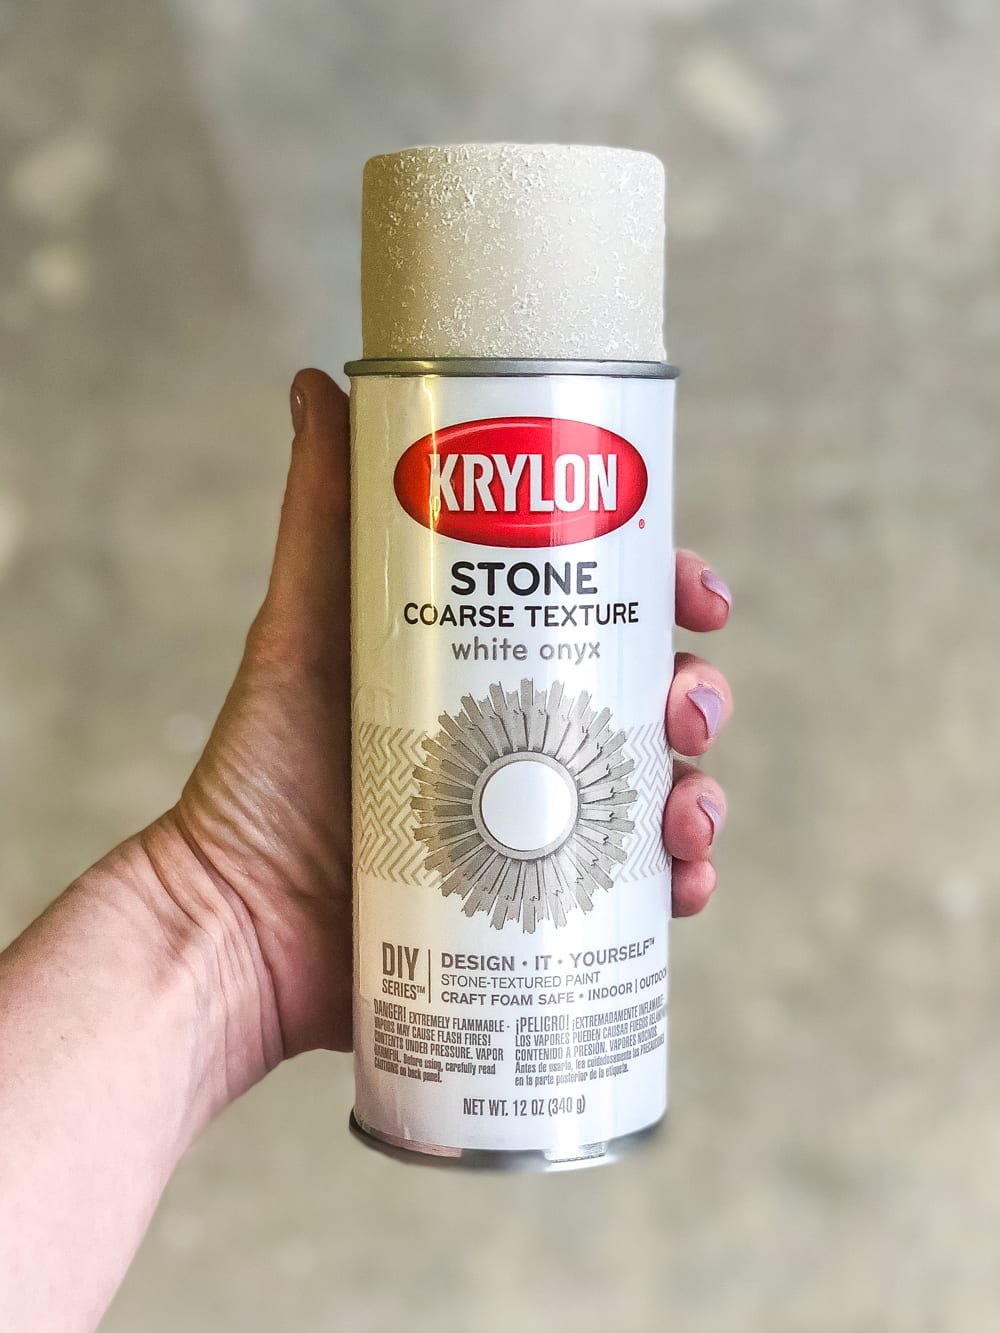
I found this stone look spray paint a few weeks ago and was determined to try it out on something because it had a really cool texture. The Steps:1. So I dug up this plain glass vase and gave it a quick coat of spray primer. 2. Once it was dry, I gave it two coats of the stone look spray paint.
3. And once the spray paint was dry, I taped off the bottom with painter’s tape (it doesn’t have to be perfect since a lot of the stoneware vases have that earthy, imperfectly dipped look to them).
4. Then I just mixed up some light brown and light gray craft paint I had to paint the bottom of the vase.
Isn’t it cute?! It’s a fun thrifty craft at least that I can’t wait to fill with colorful blooms when spring finally decides to arrive. (Please, please arrive!)
Next time I’m at the thrift store though, I’m totally scooping up more plain glass vases because I see them all the time. Adding that one to the always-buy-at-thrift-stores list for sure. If you want to save this post for later, you can pin it here:
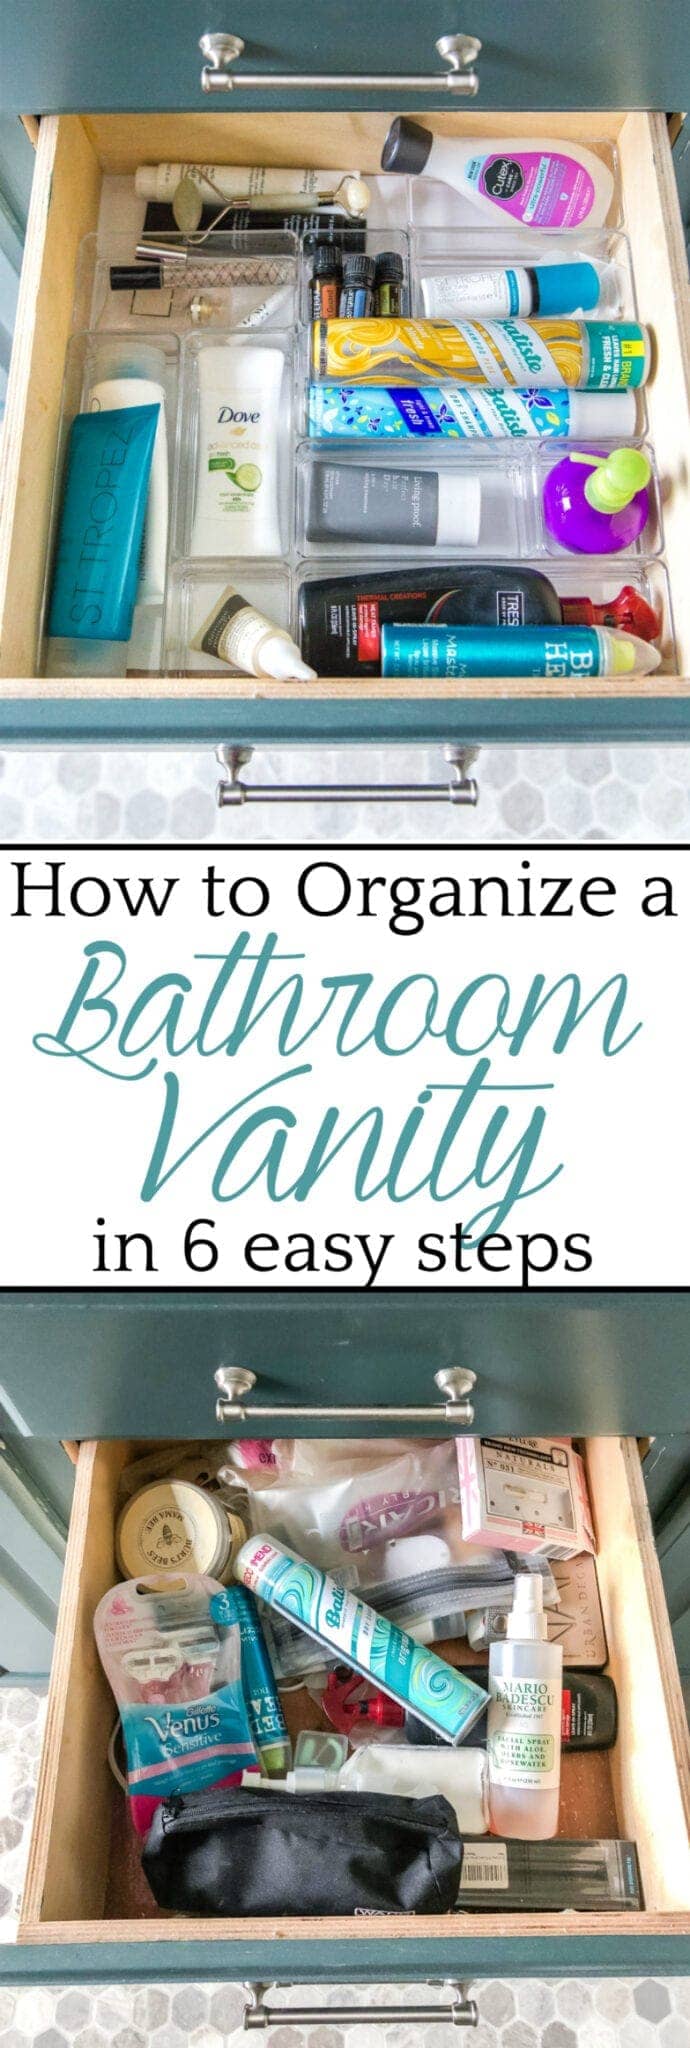
The post DIY Stoneware from a Thrifted Vase appeared first on Bless'er House. Originally from Bless'er House https://ift.tt/2BNgk0Z The must-do steps to thoroughly organize your bathroom drawers and cabinets and the best tools to keep them looking tidy.It’s been a weird week, y’all. In the past few days, I had a massive fail on a little craft project, Regan has been waking up every hour at night, our last wall decorating project for the master bathroom is taking way longer than I planned, a table I ordered for our breakfast nook ended up being the wrong measurements, and relentless rain has meant I can’t photograph any of it anyway. Boo to the hoo! BUT (don’t you always love when there’s a “but” in spite of things going wrong?) I tackled a crazy organization project that I’ve been dying to do for over a year!
Since we’ve been full steam ahead on the master bathroom anyway, I finally decided to deal with the out-of-control clutter hiding in our bathroom vanity drawers and cabinets. I really don’t share organization projects enough with y’all, but I hope this one helps if you have a similar explosion of bathroom chaos.
Our freshly painted vanity is finally pretty on the outside, but it held a really ugly secret. Dun dun dun…
Ughhhhhh so bad! And so embarrassing! But you won’t judge us, right? It’s amazing how exponentially worse this vanity got after Regan was born a few months ago. If you ever need advice on tackling your own bathroom vanity, here’s the key…(Some affiliate links are provided below for convenience. Full disclosure here.) Supplied Used:
1. Take everything out. EVERYTHING!Don’t try to work around things and just remove the items you want to toss. Sprawl every bottle, hairbrush, and curling iron stuffed into that vanity on your countertop. 2. Sort.Throw away items you haven’t used in at least 6 months. If you haven’t used them lately, chances are you never will (and if it’s makeup, it’s probably expired anyway). Then, place items into piles based on how you’d like to separate them into cabinets and drawers.
3. Vacuum drawers.A must! Especially if you have makeup residue and spills. You can just use a handheld vacuum to knock it out in a few seconds. 4. Cut and place contact paper in the bottom.We had this old contact paper in the bottom of our cabinets that was probably 20+ years old. I ripped it out, cleaned up the gross bottom, and replaced it with this clean, white contact paper that had a pretty wood grain.
Soooo much better.
5. Place vertical storage in cabinets.For under our sinks, I found these wire stackable basket drawers so that we could utilize more vertical space for holding hair styling tools and cleaning supplies. 6. Place drawer organizers.I picked up these clear drawer organizers on Amazon, but I’ve even used little baskets from the dollar store in the past. So now everything has a “home” in our vanity. My side of the vanity now looks like this:
And my hair dryer, curling irons, and straightener are all corralled into these drawers along with my makeup bag and manicure bag.
And since Robert has exponentially fewer grooming items (ha… imagine that), I stored the bathroom cleaning supplies on his side.
The top drawer holds some of our shared items like toothpaste, floss, etc.
The next drawer is mine to hold all of my hair care and skin care items.
The third drawer is Robert’s for all of his shaving supplies and the like.
And I used the bottom drawer for holding extras and our travel toiletry bags that we can grab whenever we’re packing for trips.
I feel like I can breathe again! And getting ready is so much faster now because I can actually find things!
Now that THAT job is behind me, I’m really hoping to finally have this bathroom 100% finished once wall decor is up this weekend. Ahhhhh! Stoked! If you want more organization help to get a jump start on spring cleaning, you can see all of my past organizing adventures here. Are y’all going stir crazy with snow/ice/rain right now and starting to organize to pass the days until spring? If it keeps up, the rest of our house might actually get organized too. If you want to save this post for later, you can pin it here:
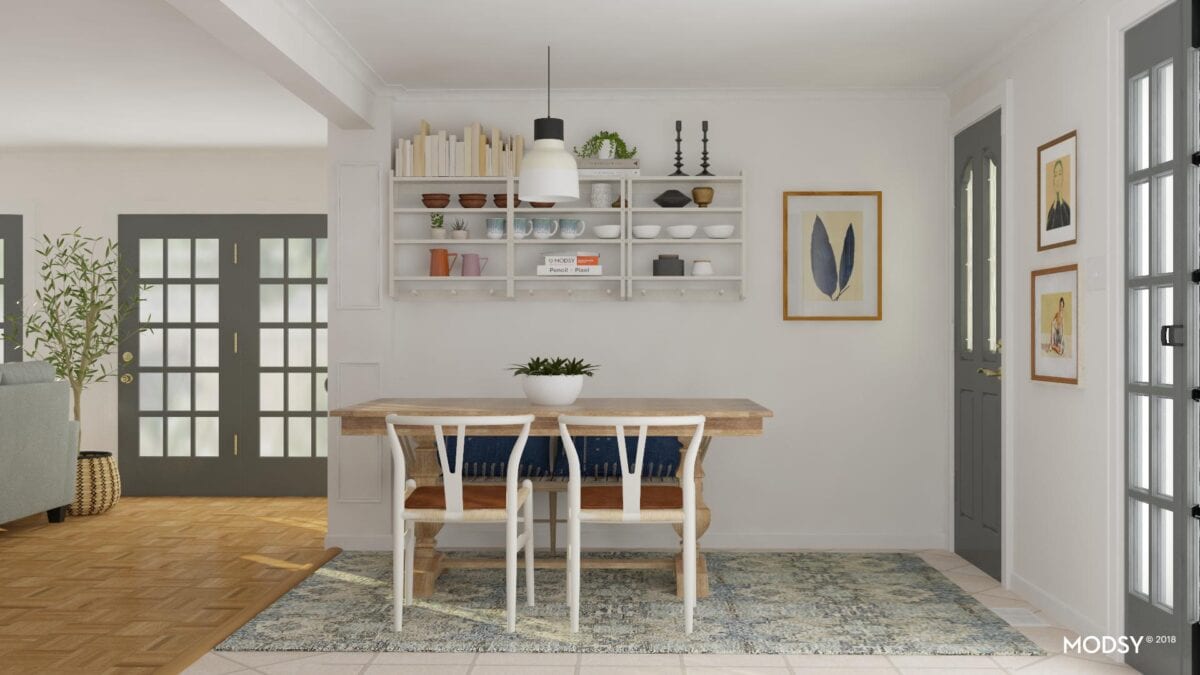
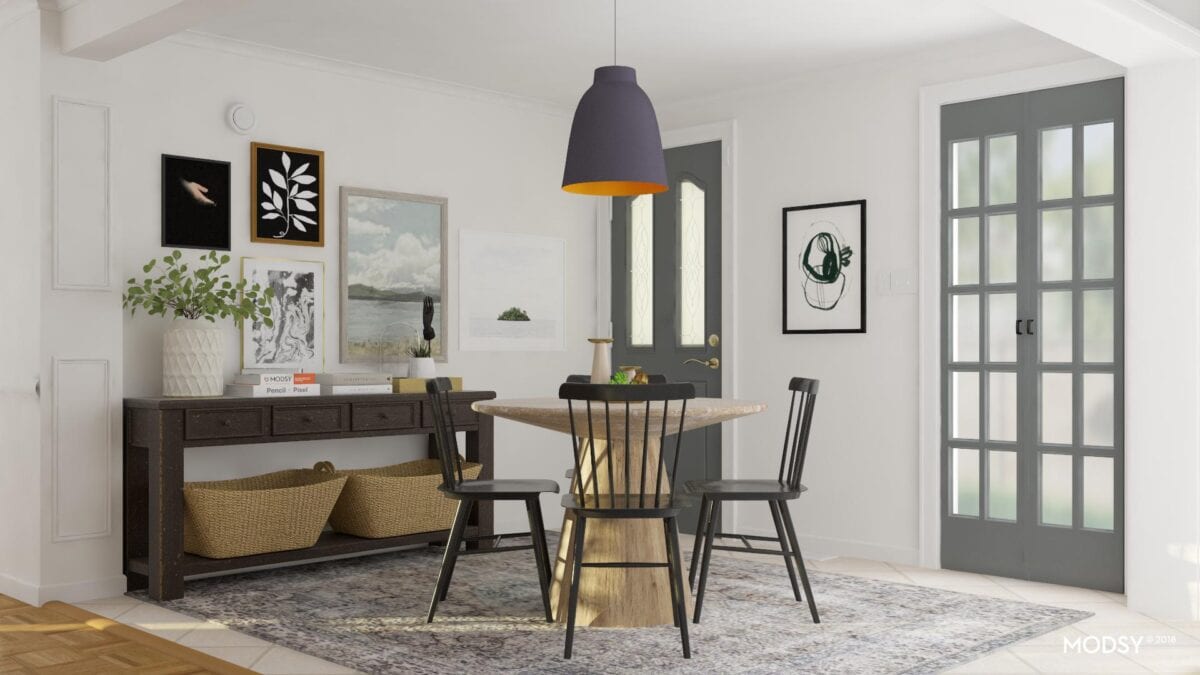
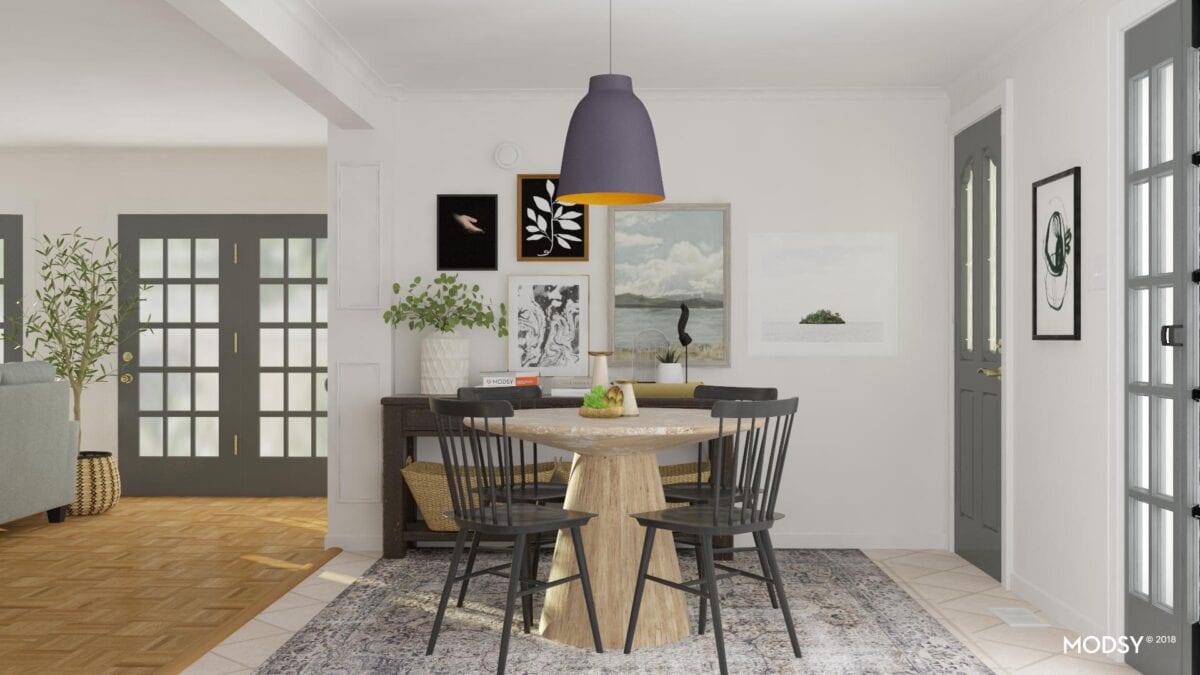
The post How to Organize a Bathroom Vanity in 6 Quick Steps appeared first on Bless'er House. Originally from Bless'er House https://ift.tt/2EnHcX7 An online 3D design rendering tool to help you plan furniture layouts and decor to fit your own personal style using images of your own home.This post is sponsored by Modsy. I should start this post with a big giant “nerd alert” banner. Because back when I was a teenager, I used to be obsessed with playing The Sims simply for designing the houses. I couldn’t care less if all of my characters “died” so long as I had a million dollars and could decorate the rooms. So whenever I see the 3D room design rendering tools on all of the HGTV shows, I think, “I could seriously just play with that program all day and be thoroughly entertained.” And then I stumbled upon this website called Modsy that made all of my nerdy little designer dreams come true. If you’ve never heard of it, Modsy is a personalized home design tool that uses 3D visualization technology to let you try on furniture in rooms of your own home before you buy it. (Psst… there’s a coupon code at the bottom of this post: BLESSER20) I’d been seeing it pop up on Facebook for months and finally decided to take the plunge because there was this one room in our house that has left me stumped ever since we moved in… our breakfast nook.
It’s just a weird room. Because it is a really small room with four doorways that all get used constantly throughout the day connecting our garage, our laundry room, our kitchen, and our living room. And yet we use it all the time for pretty much all of our meals as a family when we’re home, so it has to be functional.
I stuck an old wooden table in the space when we first moved in just to get by for a while, and after puppy training last year, the rug that was once here bit the dust. So it’s been desperate for an overhaul. To get some help from Modsy, I walked around the room and snapped some quick photos with my cell phone and uploaded them to the website. Nothing fancy or photographer-y.
I submitted measurements of the space and filled out a questionnaire along with a style finder quiz that was so eye-opening! Turns out my style is called “Refined Rustic” with a mix of sophisticated, minimal, comfort, and a touch of modern Scandinavian. I had no idea (which I’ve mentioned before because I’m a rather lost designer wannabe). (You can take the style quiz here. That, all on its own, was really helpful.)
I waited a few days while the pros worked their magic, and I received two design ideas in my inbox with a couple of furniture layout ideas, color schemes, and decor selections… and the 3D images blew. my. mind!
Isn’t that crazy?! I geeked out. (But I warned you about The Sims obsession, so you shouldn’t be surprised.) The guesswork was all done for me, and I’m so ready to tackle this room that has bugged me since Day 1 in this house. When you receive your designs, Modsy provides a list of all of the sources they used so that you can shop for any of the pieces you like and get a discount through their website. So now I have to ask, which design do you like best? Design 1Design 1 with the bench seating against the wall?
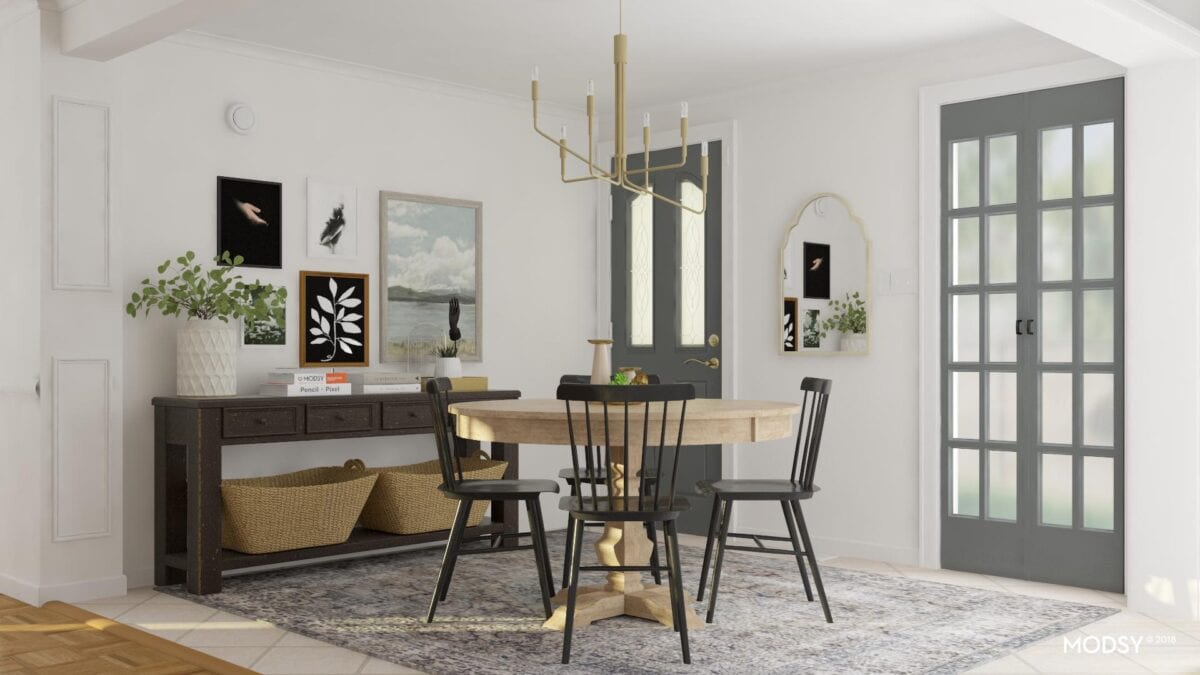
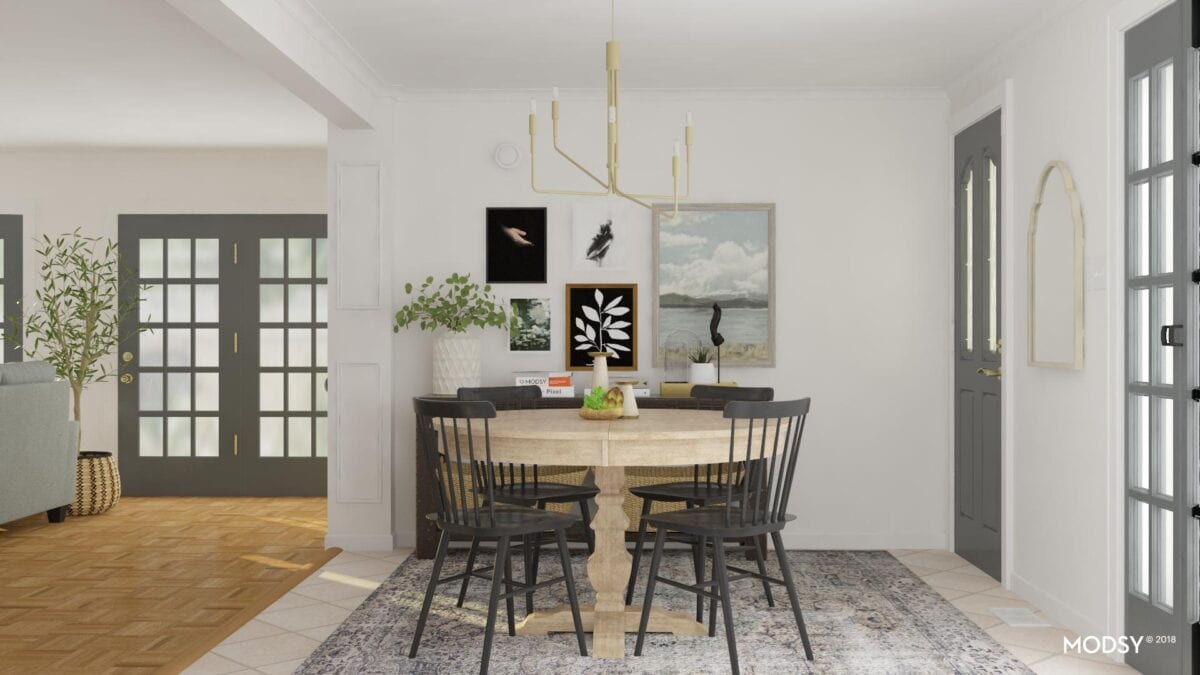
Design 2Design 2 with the round table in the middle and a modern pendant light?
Design 3Design 3 with a brass light fixture and more traditional mirror in place of the modern art?
Design 4Or Design 4 with a more traditional table?
They include a birds eye view too, which helps so much in figuring out the layout. They even got our floor vent in the right spot. Sorcery, I tell you.
What’s your vote? Design 1, 2, 3, 0r 4? If you want to try out Modsy for yourself, you can click here and use the coupon code BLESSER20 to get 20% off the Multi, Premium, or Classic design packages. I hope it helps, if you have a stumper room like we did!
The post My New Favorite Tool For Room Design Planning appeared first on Bless'er House. Originally from Bless'er House http://bit.ly/2X7FvEx
Via http://thepaintedhive.net/2019/02/quick-easy-spray-paint-update/ Happy almost weekend y’all! The kids are out of school, rain is in the forecast for the next week solid, and I am totally admitting that I’m taking the lazy route of sitting on my duff in my jammies to indulge in some online shopping since the master bathroom refresh is finally finished. (Sharing that next week though.) There are SO many good sales happening right now, and I’m trying to be better about sharing big sale weekends with y’all whenever they hit (being budget-friendly focused and all that).
To make it easy for you guys, I wrote up a master list of a bunch of the major sales at all of my favorite online home stores. And I included a few favorite items from each place that have some of the best discounts. I hope it helps! (Affiliate links are provided below. Full disclosure here.) World Market
//
!function(d,s,id){
var e, p = /^http:/.test(d.location) ? 'http' : 'https';
if(!d.getElementById(id)) {
e = d.createElement(s);
e.id = id;
e.src = p + '://widgets.rewardstyle.com/js/shopthepost.js';
d.body.appendChild(e);
}
if(typeof window.__stp === 'object') if(d.readyState === 'complete') {
window.__stp.init();
}
}(document, 'script', 'shopthepost-script');
//
Turn on your JavaScript to view content
Amazon
//
!function(d,s,id){
var e, p = /^http:/.test(d.location) ? 'http' : 'https';
if(!d.getElementById(id)) {
e = d.createElement(s);
e.id = id;
e.src = p + '://widgets.rewardstyle.com/js/shopthepost.js';
d.body.appendChild(e);
}
if(typeof window.__stp === 'object') if(d.readyState === 'complete') {
window.__stp.init();
}
}(document, 'script', 'shopthepost-script');
//
Turn on your JavaScript to view content
Target
//
!function(d,s,id){
var e, p = /^http:/.test(d.location) ? 'http' : 'https';
if(!d.getElementById(id)) {
e = d.createElement(s);
e.id = id;
e.src = p + '://widgets.rewardstyle.com/js/shopthepost.js';
d.body.appendChild(e);
}
if(typeof window.__stp === 'object') if(d.readyState === 'complete') {
window.__stp.init();
}
}(document, 'script', 'shopthepost-script');
//
Turn on your JavaScript to view content
Overstock
//
!function(d,s,id){
var e, p = /^http:/.test(d.location) ? 'http' : 'https';
if(!d.getElementById(id)) {
e = d.createElement(s);
e.id = id;
e.src = p + '://widgets.rewardstyle.com/js/shopthepost.js';
d.body.appendChild(e);
}
if(typeof window.__stp === 'object') if(d.readyState === 'complete') {
window.__stp.init();
}
}(document, 'script', 'shopthepost-script');
//
Turn on your JavaScript to view content
Walmart
//
!function(d,s,id){
var e, p = /^http:/.test(d.location) ? 'http' : 'https';
if(!d.getElementById(id)) {
e = d.createElement(s);
e.id = id;
e.src = p + '://widgets.rewardstyle.com/js/shopthepost.js';
d.body.appendChild(e);
}
if(typeof window.__stp === 'object') if(d.readyState === 'complete') {
window.__stp.init();
}
}(document, 'script', 'shopthepost-script');
//
Turn on your JavaScript to view content
Home Depot
//
!function(d,s,id){
var e, p = /^http:/.test(d.location) ? 'http' : 'https';
if(!d.getElementById(id)) {
e = d.createElement(s);
e.id = id;
e.src = p + '://widgets.rewardstyle.com/js/shopthepost.js';
d.body.appendChild(e);
}
if(typeof window.__stp === 'object') if(d.readyState === 'complete') {
window.__stp.init();
}
}(document, 'script', 'shopthepost-script');
//
Turn on your JavaScript to view content
Joss & Main
//
!function(d,s,id){
var e, p = /^http:/.test(d.location) ? 'http' : 'https';
if(!d.getElementById(id)) {
e = d.createElement(s);
e.id = id;
e.src = p + '://widgets.rewardstyle.com/js/shopthepost.js';
d.body.appendChild(e);
}
if(typeof window.__stp === 'object') if(d.readyState === 'complete') {
window.__stp.init();
}
}(document, 'script', 'shopthepost-script');
//
Turn on your JavaScript to view content
Birch Lane
//
!function(d,s,id){
var e, p = /^http:/.test(d.location) ? 'http' : 'https';
if(!d.getElementById(id)) {
e = d.createElement(s);
e.id = id;
e.src = p + '://widgets.rewardstyle.com/js/shopthepost.js';
d.body.appendChild(e);
}
if(typeof window.__stp === 'object') if(d.readyState === 'complete') {
window.__stp.init();
}
}(document, 'script', 'shopthepost-script');
//
Turn on your JavaScript to view content
All Modern
//
!function(d,s,id){
var e, p = /^http:/.test(d.location) ? 'http' : 'https';
if(!d.getElementById(id)) {
e = d.createElement(s);
e.id = id;
e.src = p + '://widgets.rewardstyle.com/js/shopthepost.js';
d.body.appendChild(e);
}
if(typeof window.__stp === 'object') if(d.readyState === 'complete') {
window.__stp.init();
}
}(document, 'script', 'shopthepost-script');
//
Turn on your JavaScript to view content
Pier 1 Imports
//
!function(d,s,id){
var e, p = /^http:/.test(d.location) ? 'http' : 'https';
if(!d.getElementById(id)) {
e = d.createElement(s);
e.id = id;
e.src = p + '://widgets.rewardstyle.com/js/shopthepost.js';
d.body.appendChild(e);
}
if(typeof window.__stp === 'object') if(d.readyState === 'complete') {
window.__stp.init();
}
}(document, 'script', 'shopthepost-script');
//
Turn on your JavaScript to view content
Kirkland’s
//
!function(d,s,id){
var e, p = /^http:/.test(d.location) ? 'http' : 'https';
if(!d.getElementById(id)) {
e = d.createElement(s);
e.id = id;
e.src = p + '://widgets.rewardstyle.com/js/shopthepost.js';
d.body.appendChild(e);
}
if(typeof window.__stp === 'object') if(d.readyState === 'complete') {
window.__stp.init();
}
}(document, 'script', 'shopthepost-script');
//
Turn on your JavaScript to view content
Wayfair
//
!function(d,s,id){
var e, p = /^http:/.test(d.location) ? 'http' : 'https';
if(!d.getElementById(id)) {
e = d.createElement(s);
e.id = id;
e.src = p + '://widgets.rewardstyle.com/js/shopthepost.js';
d.body.appendChild(e);
}
if(typeof window.__stp === 'object') if(d.readyState === 'complete') {
window.__stp.init();
}
}(document, 'script', 'shopthepost-script');
//
Turn on your JavaScript to view content
One Kings Lane
//
!function(d,s,id){
var e, p = /^http:/.test(d.location) ? 'http' : 'https';
if(!d.getElementById(id)) {
e = d.createElement(s);
e.id = id;
e.src = p + '://widgets.rewardstyle.com/js/shopthepost.js';
d.body.appendChild(e);
}
if(typeof window.__stp === 'object') if(d.readyState === 'complete') {
window.__stp.init();
}
}(document, 'script', 'shopthepost-script');
//
Turn on your JavaScript to view content
Michael’s
//
!function(d,s,id){
var e, p = /^http:/.test(d.location) ? 'http' : 'https';
if(!d.getElementById(id)) {
e = d.createElement(s);
e.id = id;
e.src = p + '://widgets.rewardstyle.com/js/shopthepost.js';
d.body.appendChild(e);
}
if(typeof window.__stp === 'object') if(d.readyState === 'complete') {
window.__stp.init();
}
}(document, 'script', 'shopthepost-script');
//
Turn on your JavaScript to view content
Houzz
//
!function(d,s,id){
var e, p = /^http:/.test(d.location) ? 'http' : 'https';
if(!d.getElementById(id)) {
e = d.createElement(s);
e.id = id;
e.src = p + '://widgets.rewardstyle.com/js/shopthepost.js';
d.body.appendChild(e);
}
if(typeof window.__stp === 'object') if(d.readyState === 'complete') {
window.__stp.init();
}
}(document, 'script', 'shopthepost-script');
//
Turn on your JavaScript to view content
The post Master List of President’s Day Weekend Sales appeared first on Bless'er House. Originally from Bless'er House http://bit.ly/2SBHsKN
Via http://thepaintedhive.net/2019/02/100-kitchen-makeover-reveal/ |